
I describe the script that is written for Arduino ESP8266 and ESP32 microcontroller boards in detail. With the example code below you can control the exact position of the servo motor and it also includes code to sweep the.
Continuous Rotation Servo Arduino Responding To Button Press Stack Overflow
How To Control Servo Motors With Arduino 3 Examples

Using Servo Motors With The Arduino Dronebot Workshop
Tested compatible with Arduino UNO Leonardo ADKMega R3 Diecimila Duemilanove.
Continuous servo arduino code. 2 2 Reviews USD 750. The Adafruit 16-Channel 12-bit PWMServo Driver will drive up to 16 servos over I2C with only 2 pins. Remember that using the Servo library automatically disables PWM functionality on PWM pins 9 and 10 on the Arduino UNO and similar boards.
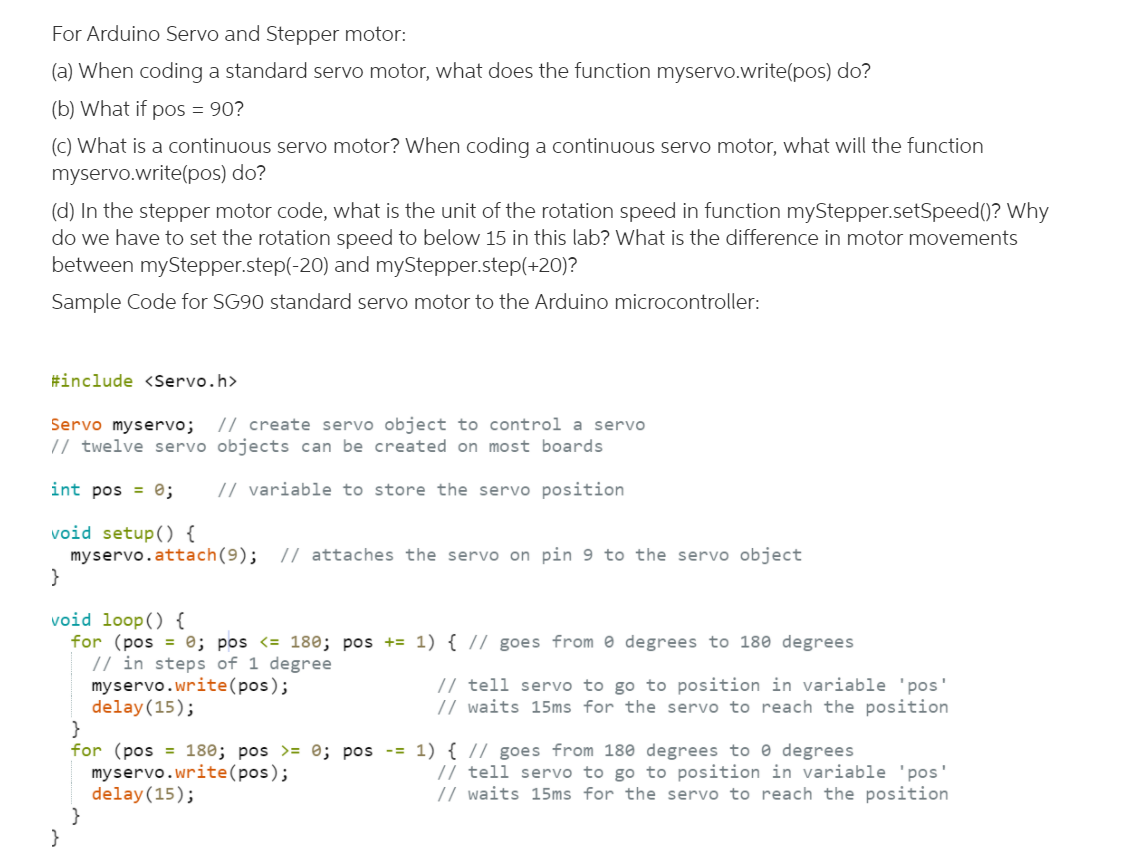
The servowrite function receives the angle in degrees as the argument. After the wiring between the microcontroller and the servo motor we create the Arduino script that moves the servo motor forward to a degree of 180 and back to 0 degree. Continuous rotation servos allow the rotation of the shaft to be set to various speeds.
FS5103R Continuous Servo Motor Product Code. The Arduino sketch. Please wait while we retrieve the approximate arrival date.
There is a library in Arduino called servoh that includes some useful function for controlling the servo motor and can support up to 12 motors on most Arduino boards. Arduino UNO have two interrupt ports and Arduino Mega2560 have six interrupt ports named as INT1INT0. That is whether you run servowrite90 forever or once the servo will go to 90 and continue to actively keep that position until you write another position.
Driving servo motors with the Arduino Servo library is pretty easy but each one consumes a precious pin - not to mention some Arduino processing power. 3 sensor DHT22AM2302 code csv output format Example testing sketch for various DHT humiditytemperature sensors Written by ladyada public domain Modified 3152021 by Richard Franklin for 3 sensors and csv output format Just drop the DHT folder that has DHTh into the main arduino libraries folder if you dont want to install adafruit extra libraries etc. This has been modified to demonstrate very unstable operation of ther regular servo as contineous serveo.
The Arduino Integrated Development Environment IDE or Arduino software comes pre-installed with a default stepper library. Note that each Arduino Board has different SPI pins which should be connected accordingly. Using Microseconds instead of Angles.
Each lead has a color code. Analog pin used to connect the potentiometer int val. LIDAR stands for Light Detection and Ranging.
While using this shield 6 analog Pins which can be used as digital pins too pin 2 and pin 13 of arduino are free. Works with Due with 33v logic jumper. Driving servo motors with the Arduino Servo library is pretty easy but each one consumes a precious pin - not to mention some Arduino processing power.
Create servo object to control a servo int potpin 0. The Servo library supports up to 12 motors on most Arduino boards and 48 on the Arduino Mega. This library provides us with a whole series of commands to manage Servo Motors in an easy and intuitive way.
Servo motor with Arduino example code. Example Code for Connecting the Arduino. The on-board PWM controller will drive all 16 channels simultaneously.
How to Use Arduino L293D Motor Driver Shield. 599 Menlo Drive Ste100 Rocklin CA 95765 USA Toll-free 888-512-1024. Variable to read the value from the analog pin void setup myservoattach9.
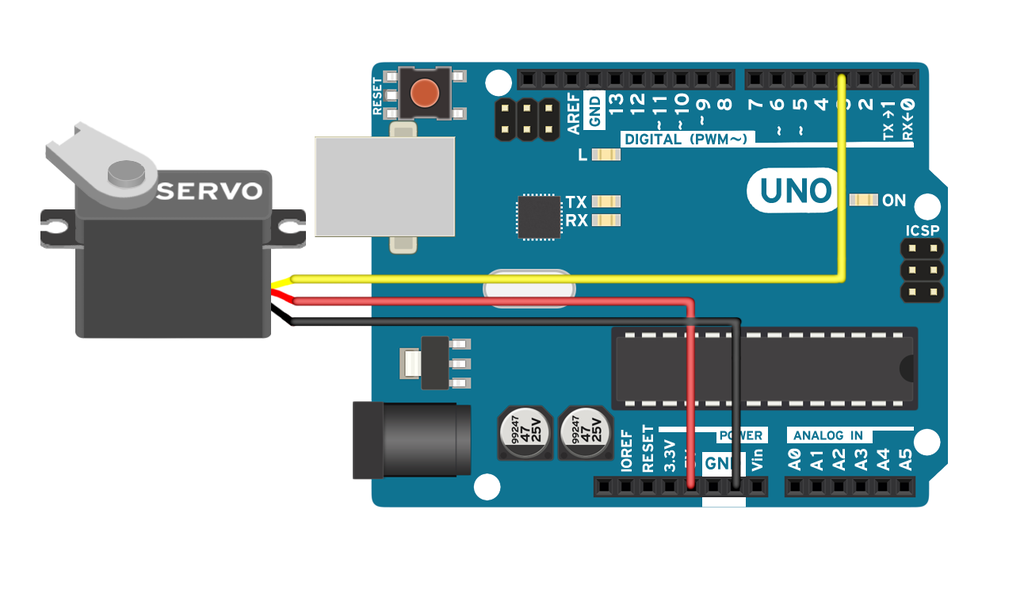
On boards other than the Mega use of the library disables analogWrite PWM functionality on pins 9 and 10 whether or not there is a Servo on those pins. This servo motor is not a real and practical motor. Connect the red wire from the servo to the 5V on the Arduino.
This post aims to be a complete guide for nRF24L01 24GHz RF Transceiver module. LIDAR is used for many applications including 3D scanning mapping laser guidance etc. Click here to go to the official page and download the latest release of the Arduino IDE.
Include Servo myservo. If you are using a different Arduino board it is advisable to check the official documentation about SPI pin locations before proceeding. So you have to connect the brown wire from the micro servo to the GND pin on the Arduino.
In this code snippet pos is incremented from 0 to 180 inside a for loop and then decremented from 180 to 0 in another for loop. In the case of using Servo motor pins 9 10 2. If you want to write microseconds for controlling instead of degrees you can use the writeMicroseconds function.
And finally connect the orange wire from the SG90 servo to a digital pin pin 9 on the Arduino. Different types of Arduino board have different numbers of interrupts pins eg. You have to define.
Attaches the servo on pin 9 to the servo object void loop val analogReadpotpin. On boards other than the Mega use of the library disables analogWrite PWM functionality on pins 9 and 10 whether or not there is a Servo on those pins. Hence there is no need to download the library.
The only way to turn a servo off is. 5v or 33v compatible logic levels - jumper configurable. On the first line of the code we will first include the header file of this built-in.
First you have to include the Servo library already included within dellArduino IDE. Ill explain what it does show its specs and share an Arduino project example that you can take and apply to. For Arduino boards such as the UNONano V30 those pins are digital 13 SCK 12 MISO 11 MOSI and 10 SS.
The code simply declares the servo object and then initializes the servo by using the servoattach function. For such servo the normal Arduino code for servo motors wont work. Reads the value of the potentiometer value between 0 and 1023.
First let us develop the sketch with the Arduino IDE. Download the easy-to-use Arduino software library check out the examples and youre ready to go. Works with MegaADK R2 and earlier with 2 wire jumpers.
A normal servo doesnt have a go function it only has positional control. The Adafruit 16-Channel 12-bit PWMServo Driver will drive up to 16 servos over I2C with only 2 pins. Define MAX_PWM 2150 define MID_PWM 1500 define MIN_PWM 850.
I believe by continuous rotation servo you mean servos similar to TowerPro MG-995 or Winch Servo HS-785HB. To control the servo motor we will be using the Servoh library which comes pre-installed with the Arduino IDE. The servo motor has three leads with one more than a DC motor.
Continuous rotation servos allow the rotation of the shaft to be set to various speeds. On the software side create sleep mode for Arduino and use a timer base interrupts which would internally be essentially triggering awakening function and not relay on any external hardware. On board other than the Arduino Mega using the library disables the PWM functionality on pin 9 and 10 regardless of whether the servo is connected to those pins or not.
This is a common example that. The Servo library supports up to 12 motors on most Arduino boards and 48 on the Arduino Mega. This video explains this code on how to control continuous moving servo or 360 degree servo.
Within that example can you confirm the baud rate is set to 115200 and the serial terminal in Arduino is also set to 115200.
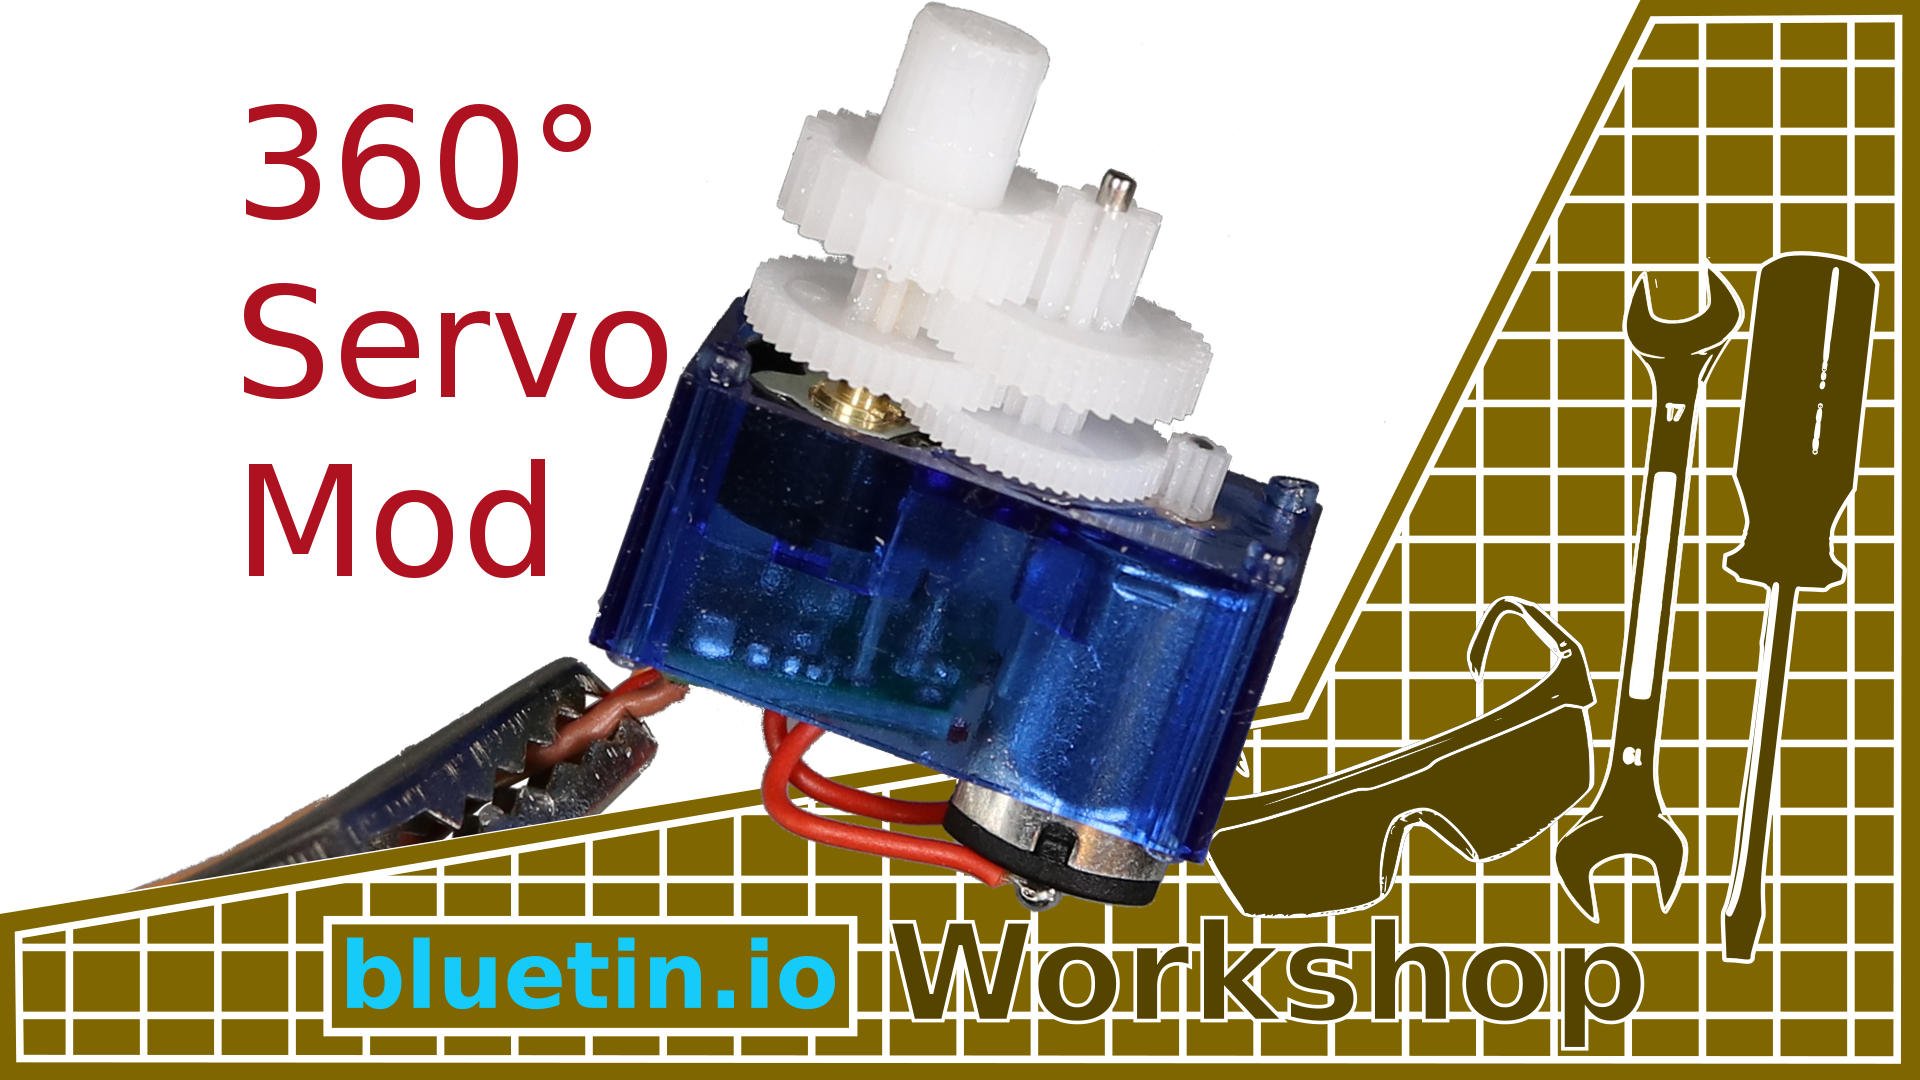
360 Degree Mod For Servo Continuous Rotation Guide Bluetin Io
Solved For Arduino Servo And Stepper Motor A When Coding Chegg Com

6 Continuous Servo With Arduino Mega Robot Parts Robotshop Community
Arduino Servo Motors 5 Steps With Pictures Instructables
How To Program An Rc Servo To Stop At 90 Degrees By Arduino Quora

Servo Motor Continuous Rotation Arduino Ese205 Wiki
1
Continuous Rotation Servos And Arduino


